
Welcome back, Dear Reader, to my ongoing series cataloging my competitive and hobby journey through 2023. Last time around I wrote about getting to the KC Open and playing my stream game of 10th edition with Death Guard. This time I’m going to talk about the first day of the event proper, including the games I played.
Day 1
Our day starts at 8:30am and while I slept OK, I could have used another hour or so of sleep. I decide to head down early however for the captain’s briefing in a show of solidarity with team captain Scott Horras “Heresy.” Scott’s a better fit than me here for captain because he actually understands the pairing process (I think) and is willing to put in the work to do all that matrix bullshit. I’m more of a “vibes” guy when it comes to matchups and while we’ll start with some stats around army percentages, we’ll eventually just end up going off vibes and ultimately I think that’s probably a better move.
Anyways we go to the briefing and Mike Brandt runs through some of the basics of how the event is going to go. I have very little recollection of anything he said during the presentation. Scott and I listen in, then we grab some breakfast sandwiches – the hotel has a decent sausage, egg, n’ cheese – and meet up with the rest of our team.
Before we get too deep in here, let’s refresh on the army I brought:
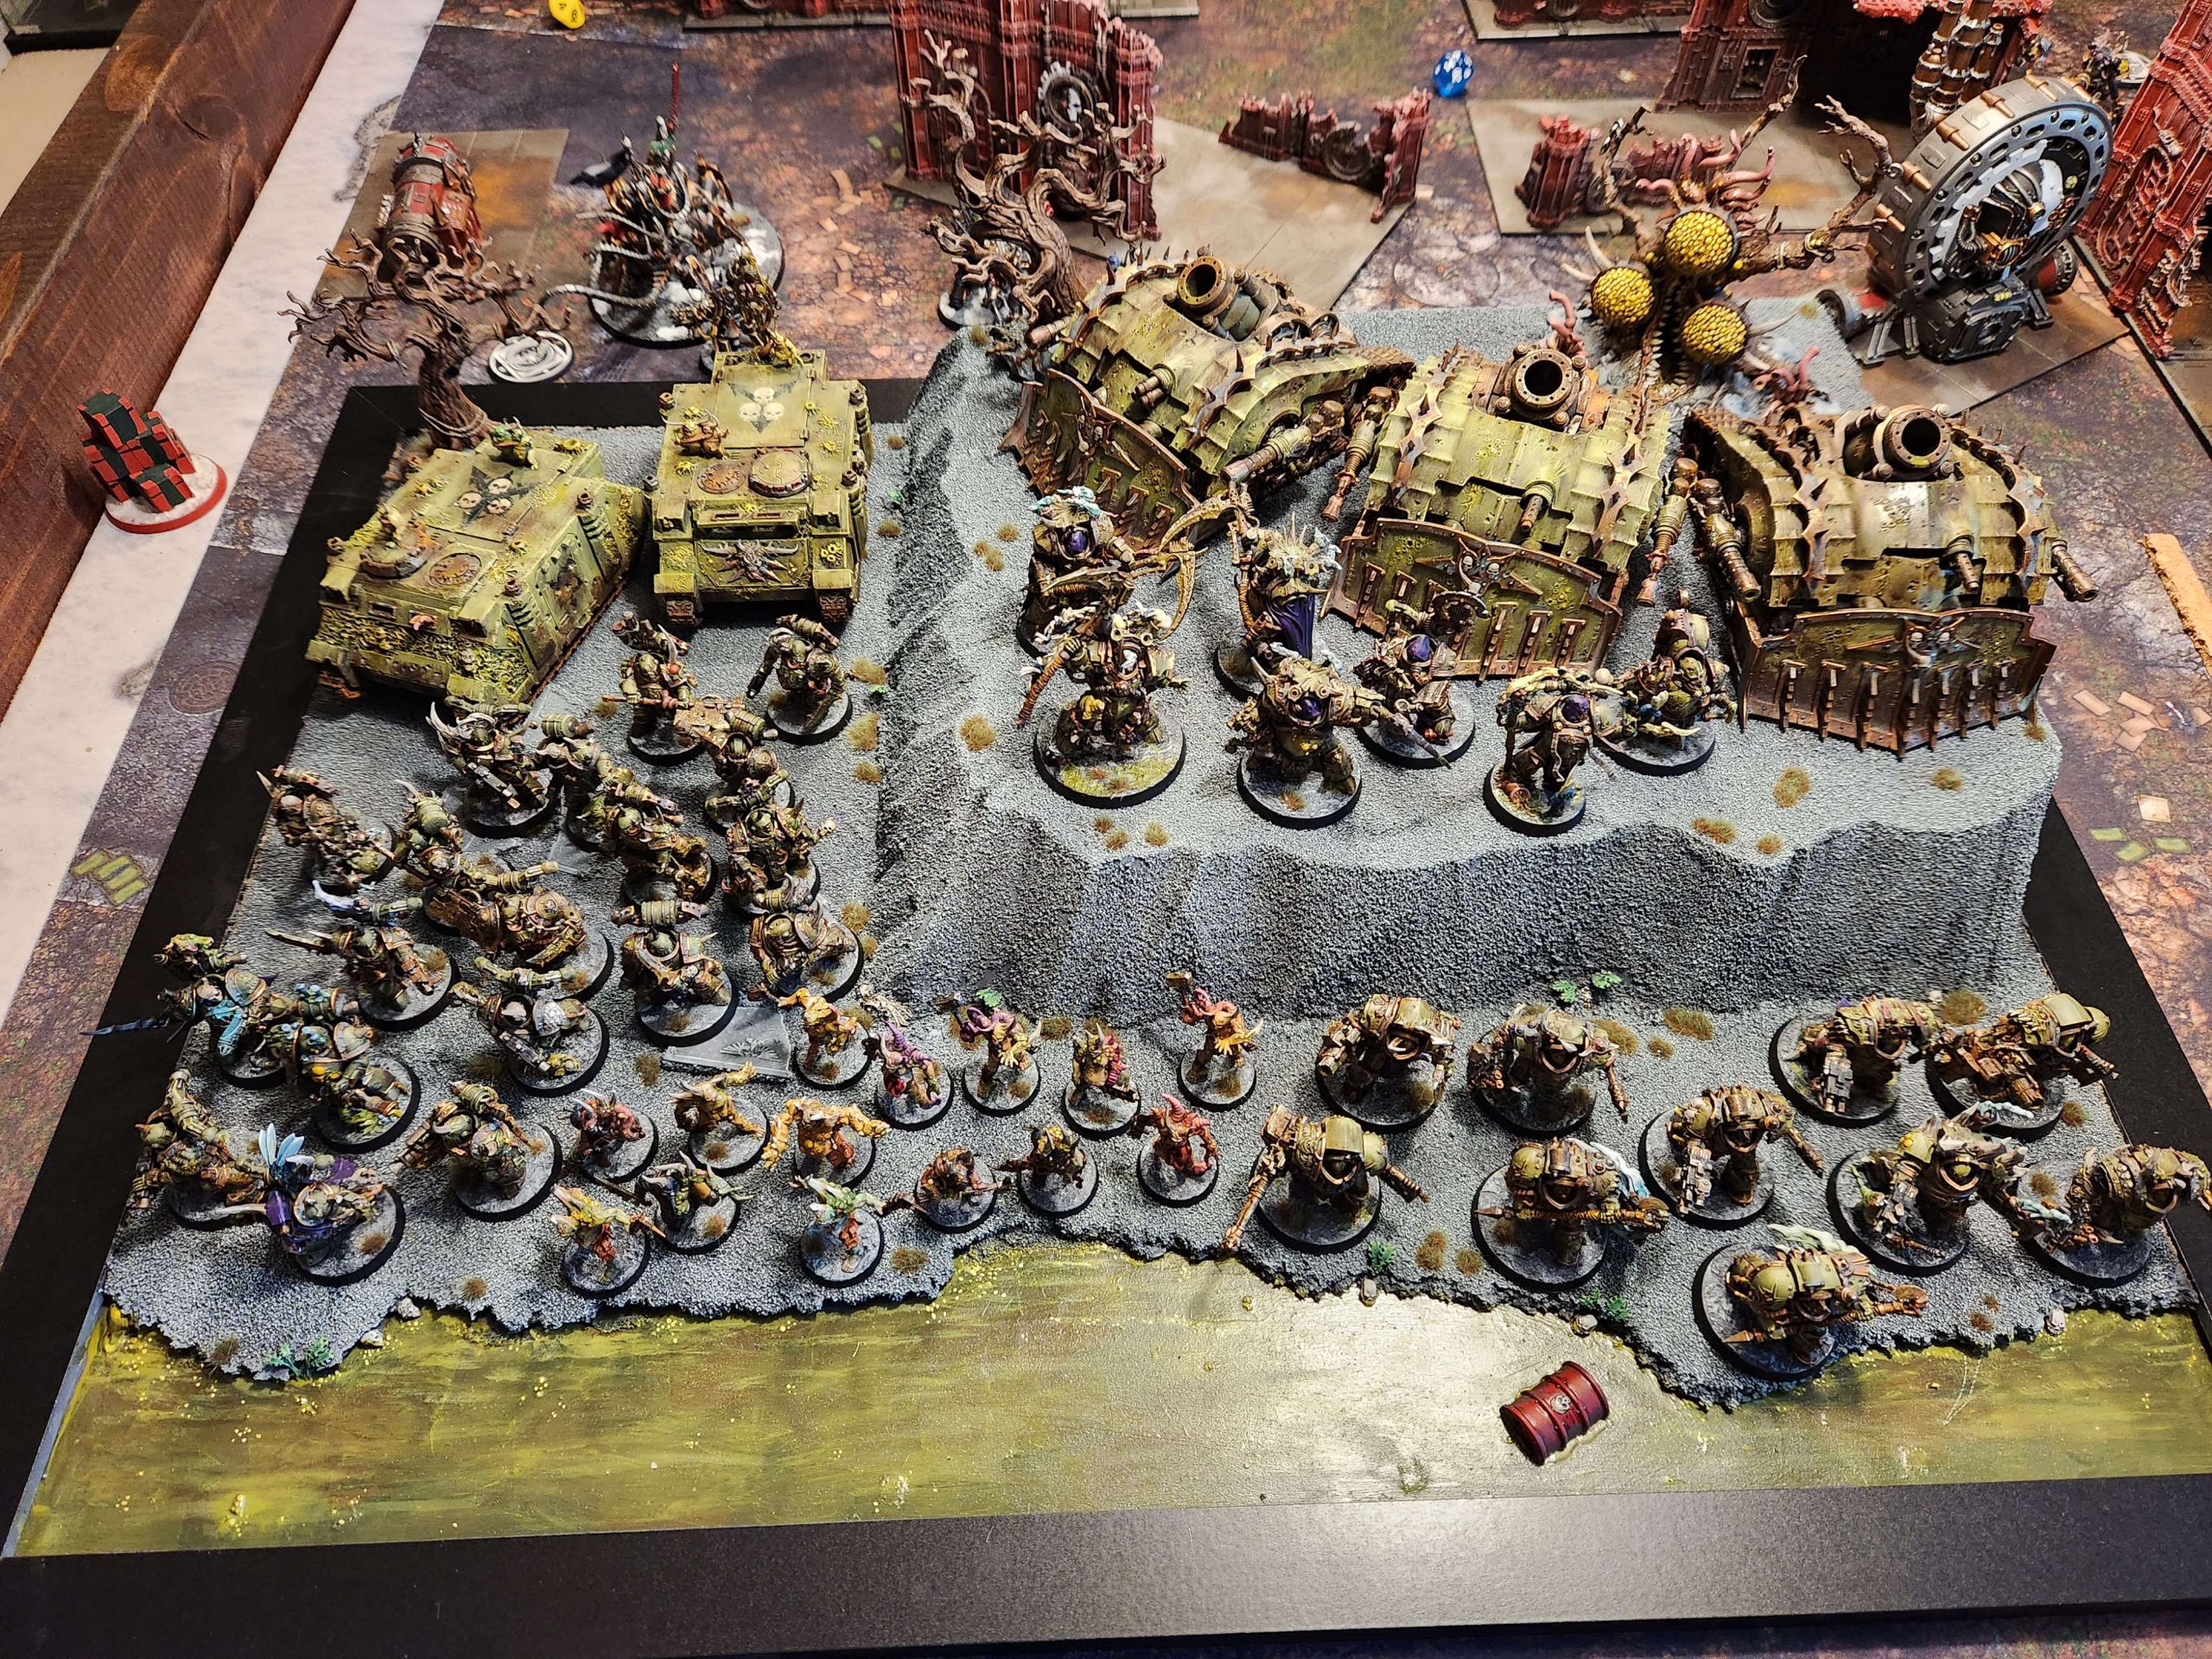
The KC Death Guard List - click to expand ++ Arks of Omen Detachment (Chaos – Death Guard) [115 PL, 3CP, 2,000pts] ++ + Configuration [6CP] + Arks of Omen Compulsory Type: Troops Battle Size [6CP]: 3. Strike Force (101-200 Total PL / 1001-2000 Points) [6CP] Detachment Command Cost Game Type: 5. Chapter Approved: Arks of Omen Plague Company: The Inexorable + HQ [14 PL, 255pts] + Malignant Plaguecaster [5 PL, 90pts]: 1. Miasma of Pestilence, 4. Putrescent Vitality, Warlord Typhus [9 PL, 165pts]: 2. Gift of Contagion, 5. Curse of the Leper + Troops [30 PL, 450pts] + Plague Marines [6 PL, 95pts] Plague Marines [6 PL, 95pts] Plague Marines [6 PL, 95pts] Plague Marines [6 PL, 95pts] Poxwalkers [6 PL, 70pts] + Elites [39 PL, -3CP, 700pts] + Blightlord Terminators [20 PL, -1CP, 400pts] Deathshroud Terminators [9 PL, 150pts] Foul Blightspawn [6 PL, -2CP, 85pts]: 4. Arch-Contaminator, Revolting Stench-vats, Stratagem: Gifts of Decay [-1CP], Stratagem: Plaguechosen [-1CP], Viscous Death [1 PL, 5pts] Tallyman [4 PL, 65pts] + Heavy Support [24 PL, 435pts] + Plagueburst Crawler [8 PL, 145pts]: 2x Entropy cannon [10pts], Heavy slugger + Dedicated Transport [8 PL, 160pts] + Chaos Rhino [4 PL, 80pts]: Combi-melta, Havoc launcher
. Plague Champion [19pts]: Plague knife, Plasma gun, Power fist
. Plague Marine w/ blight launcher [19pts]
. Plague Marine w/ cleaver [19pts]
. Plague Marine w/ flail [19pts]
. Plague Marine w/ special weapon [19pts]: Meltagun
. Plague Champion [19pts]: Daemonic plague blade, Plasma gun
. Plague Marine w/ flail [19pts]
. Plague Marine w/ mace and axe [19pts]
. Plague Marine w/ plague spewer [19pts]
. Plague Marine w/ special weapon [19pts]: Plasma gun
. Plague Champion [19pts]: Daemonic plague blade, Plasma gun, Power fist
. Plague Marine w/ boltgun [19pts]
. Plague Marine w/ icon and sigil [19pts]
. Plague Marine w/ mace and axe [19pts]
. Plague Marine w/ special weapon [19pts]: Plasma gun
. Plague Champion [19pts]: Plague knife, Plasma gun, Power fist
. Plague Marine w/ blight launcher [19pts]
. Plague Marine w/ cleaver [19pts]
. Plague Marine w/ flail [19pts]
. Plague Marine w/ special weapon [19pts]: Meltagun
. 14x Poxwalker [70pts]: 14x Improvised weapon
. Blightlord Champion [-1CP, 40pts]: Bubotic Axe, Combi-melta, Plague Skull of Glothila, Stratagem: Champion of Disease [-1CP]
. Blightlord Terminator [40pts]: Blight launcher, Bubotic Axe
. Blightlord Terminator [40pts]: Blight launcher, Bubotic Axe
. Blightlord Terminator [40pts]: Flail of corruption
. Blightlord Terminator [40pts]: Flail of corruption
. Blightlord Terminator [40pts]: Bubotic Axe, Combi-plasma
. Blightlord Terminator [40pts]: Bubotic Axe, Combi-plasma
. Blightlord Terminator [40pts]: Bubotic Axe, Combi-melta
. Blightlord Terminator [40pts]: Bubotic Axe, Combi-bolter
. Blightlord Terminator [40pts]: Bubotic Axe, Combi-bolter
. Deathshroud Champion [50pts]: Chimes of contagion, 2x Plaguespurt gauntlet
. 2x Deathshroud Terminator [100pts]: 2x Manreaper, 2x Plaguespurt gauntlet
Plagueburst Crawler [8 PL, 145pts]: 2x Entropy cannon [10pts], Heavy slugger
Plagueburst Crawler [8 PL, 145pts]: 2x Entropy cannon [10pts], Heavy slugger
Chaos Rhino [4 PL, 80pts]: Combi-melta, Havoc launcher
I’m pretty comfortable with this list but I am getting fucked in that GW doesn’t give any allowance for Typhus’ horribly written rules. That means I won’t get the Inexorable Stratagem. I don’t necessarily need it, but it would have been nice to have if I have to go up against Daemons. This list is relatively slow but does well into any army where Fleeing Vectors is viable and can deal with some big targets in a pinch. Death Guard aren’t ideal in our army but I think I can hold my own OK.
Round 1: vs. Xenos Petting Zoo
Our round 1 matchup is a tough one: Xenos Petting Zoo are a very good team who play on the West Coast. Scott runs some stats and concludes that Norman and I have no good matchups, then we get to pairing. Generally we’re planning to put Scott out as first defender most of the time, though Shane may also be an option as our strongest player.
Our Pairings
- Scott (Astra Militarum) vs. Joel Wilson (Necrons)
- Shane (Votann) vs. Stephen Corrales (Dark Angels)
- Norman (Chaos Knights) vs. Jason McKenzie (T’au Empire)
- Goatboy (Daemons) vs. Kyle Parry (Eldar)
- Me vs. Jason Kavetsky (Astra Militarum)
During pairings I opt to take on the Astra Militarum – I’m comfortable with the matchup going in and on layout two it’s very winnable for me, especially if I get the first turn and can whittle down the kasrkin.
Jason's List - click to expand ++ Arks of Omen Detachment (Imperium – Astra Militarum) [90 PL, 1,750pts, 3CP] ++ + Configuration + Arks of Omen Compulsory Type: Heavy Support Battle Size [6CP]: 3. Strike Force (101-200 Total PL / 1001-2000 Points) Detachment Command Cost Game Type: 5. Chapter Approved: Arks of Omen Regimental Doctrine: Born Soldiers + HQ + Death Korps Marshal [2 PL, 35pts, -1CP]: Bolt pistol, Commanding Authority, Frag & Krak grenades, Power sword, Relic: Laurels of Command, Stratagem: Imperial Commander’s Armoury Lord Solar Leontus [9 PL, 170pts, -1CP]: Commanding Authority, Stratagem: Warlord Trait, Warlord, WT: Grand Strategist + Troops + Cadian Shock Troops [3 PL, 65pts] Cadian Shock Troops [3 PL, 65pts] Cadian Shock Troops [3 PL, 65pts] + Elites + Commissar [3 PL, 40pts]: Bolt pistol, Chainsword, Commanding Authority Kasrkin [5 PL, 100pts, -1CP]: Veteran Guerrillas Kasrkin [5 PL, 100pts]: Heirloom Weapons + Fast Attack + Scout Sentinels [3 PL, 40pts] Scout Sentinels [3 PL, 40pts] Scout Sentinels [3 PL, 40pts] + Heavy Support + Heavy Weapons Squad [3 PL, 55pts] Heavy Weapons Squad [3 PL, 55pts] Leman Russ Battle Tanks [9 PL, 190pts] Leman Russ Battle Tanks [9 PL, 190pts] Leman Russ Battle Tanks [9 PL, 190pts] Rogal Dorn Battle Tank [15 PL, 310pts]: Armoured Tracks, Heavy stubber, Pulveriser Cannon, Stat Damage (Rogal Dorn), Vaunted Praetorian ++ Patrol Detachment 0CP (Imperium – Astra Militarum) [17 PL, 250pts, -2CP] ++ + Configuration + Detachment Command Cost Militarum Tempestus Detachment Regimental Doctrine: Born Soldiers + HQ + Militarum Tempestus Command Squad [7 PL, 140pts, -2CP]: Commanding Authority, Relic: Clarion Proclamatus, Stratagem: Officer Cadre, Stratagem: Relic, WT: Master Tactician + Troops + Tempestus Scions [5 PL, 55pts] Tempestus Scions [5 PL, 55pts] ++ Total: [107 PL, 1CP, 2,000pts] ++
. 6x Shock Trooper: 6x Lasgun
. Shock Trooper Sergeant: Bolt Pistol and Chainsword
. Shock Trooper w/ Special Weapon: Meltagun
. Shock Trooper w/ Special Weapon: Plasma gun
. Shock Trooper w/ Vox-caster: Lasgun, Vox-Caster
. 6x Shock Trooper: 6x Lasgun
. Shock Trooper Sergeant: Bolt Pistol and Chainsword
. Shock Trooper w/ Special Weapon: Meltagun
. Shock Trooper w/ Special Weapon: Plasma gun
. Shock Trooper w/ Vox-caster: Lasgun, Vox-Caster
. 6x Shock Trooper: 6x Lasgun
. Shock Trooper Sergeant: Bolt Pistol and Chainsword
. Shock Trooper w/ Special Weapon: Meltagun
. Shock Trooper w/ Special Weapon: Plasma gun
. Shock Trooper w/ Vox-caster: Lasgun, Vox-Caster
. Kasrkin Sargeant: Chainsword, Hot-shot Laspistol, Relic: The Barbicant’s Key, Stratagem: Battlefield Bequest
. 5x Kasrkin w/ Hot-shot Lasgun: 5x Frag & Krak grenades, 5x Hot-shot Lasgun
. Kasrkin w/ Hot-shot Marksman Rifle: Frag & Krak grenades, Hot-shot Marksman Rifle
. Kasrkin w/ Special Weapon: Frag & Krak grenades, Hot-shot Volley Gun
. Kasrkin w/ Special Weapon: Frag & Krak grenades, Hot-shot Volley Gun
. Kasrkin w/ Vox-caster: Frag & Krak grenades, Hot-shot Lasgun, Vox-Caster
. Kasrkin Sargeant: Chainsword, Hot-shot Laspistol
. 3x Kasrkin w/ Hot-shot Lasgun: 3x Frag & Krak grenades, 3x Hot-shot Lasgun
. Kasrkin w/ Hot-shot Marksman Rifle: Frag & Krak grenades, Hot-shot Marksman Rifle
. Kasrkin w/ Special Weapon: Frag & Krak grenades, Hot-shot Volley Gun
. Kasrkin w/ Special Weapon: Frag & Krak grenades, Hot-shot Volley Gun
. Kasrkin w/ Special Weapon: Frag & Krak grenades, Plasma gun
. Kasrkin w/ Special Weapon: Frag & Krak grenades, Plasma gun
. Kasrkin w/ Vox-caster: Frag & Krak grenades, Hot-shot Lasgun, Vox-Caster
. Scout Sentinel: Militarum Plasma Cannon
. Scout Sentinel: Militarum Plasma Cannon
. Scout Sentinel: Militarum Plasma Cannon
. Heavy Weapon Team: Lasgun, Mortar
. Heavy Weapon Team: Lasgun, Mortar
. Heavy Weapon Team: Lasgun, Mortar
. Heavy Weapon Team: Lasgun, Mortar
. Heavy Weapon Team: Lasgun, Mortar
. Heavy Weapon Team: Lasgun, Mortar
. Leman Russ Battle Tank: Armoured Tracks, Dozer Blade, Executioner Plasma Cannon, Lascannon, Stat Damage (Leman Russ)
. . 2 Multi-meltas: 2x Multi-melta
. Leman Russ Battle Tank: Armoured Tracks, Dozer Blade, Executioner Plasma Cannon, Lascannon, Stat Damage (Leman Russ)
. . 2 Multi-meltas: 2x Multi-melta
. Leman Russ Battle Tank: Armoured Tracks, Dozer Blade, Executioner Plasma Cannon, Lascannon, Stat Damage (Leman Russ)
. . 2 Multi-meltas: 2x Multi-melta
. 2 Meltaguns: 2x Meltagun
. 2 Multi-meltas: 2x Multi-melta
. Oppressor Cannon and Co-axial Autocannon: Co-axial Autocannon, Oppressor Cannon
. Astropath: 3. Psychic Barrier, Telepathica Stave
. Tempestor Prime: Frag & Krak grenades, Tempestor Command Rod
. Tempestus Scion: Frag & Krak grenades, Plasma gun
. Tempestus Scion w/ Master-Vox: Frag & Krak grenades, Hot-shot Laspistol, Master Vox
. Tempestus Scion w/ Medi-pack: Frag & Krak grenades, Hot-shot Laspistol, Medi-pack
. Tempestus Scion w/ Regimental Standard: Frag & Krak grenades, Hot-Shot Lasgun, Regimental Standard
. Tempestor: Frag & Krak grenades, Plasma pistol, Power sword
. Tempestus Scion: Frag & Krak grenades, Hot-shot Lasgun
. Tempestus Scion w/ Special Weapon: Frag & Krak grenades, Plasma gun
. Tempestus Scion w/ Special Weapon: Frag & Krak grenades, Meltagun
. Tempestus Scion w/ Vox-caster: Hot-shot Laspistol, Vox-Caster
Jason’s list has three units of Kasrkin in it, and that’s a potential problem because I don’t have a lot of ways (read: any) to stop mortal wounds from ruining my day. My plan is to chip away at each unit with mortars before he can teleport, and then use that to make spending the CP a bad deal overall. Otherwise this isn’t a bad matchup; the plasma cannons don’t have a great damage profile for going into D-1 targets and there’s nothing here to effectively fight me at midtable. The only problem is the mission isn’t going to give me a midtable objective.
The Mission: Recover the Relics
Not my favorite mission and a really bad one to match into guard on – there’s little reason for them to press forward and with 6 objectives and hold 1/2/more plus kill points it’s almost impossible to keep someone off max primary, especially if they’re going second. That means I’m going to need to outscore Jason on secondary objectives, which means crushing my Vectors totals.
My secondaries:
- Spread the Sickness
- Fleeing Vectors
- Bring it Down
Jason’s Secondaries:
- Bring it Down
- Inflexible Command
- Raise the Banners
Bring it Down can’t max here but 12 is about as good as I can get on these secondaries while still aligning with my goals. Vectors has a downside here in that I won’t be getting charged and so scoring vectors in my opponent’s turn is harder. That said, there are lots of models and 10-model units to hit with mortars so I like my odds. The Guard secondaries are hard to stop but I can prevent giving up a ton of points on Bring it Down if I protect my PBCs – and I need them to take out Jason’s vehicles anyways. In this matchup I’m hoping to go first and whittle down the Kasrkin while pressing forward. Jason’s a cowardly guard player, so outside of his Kasrkin he’ll plan on turtling up and shooting me from a distance. All I need to do is weather the storm long enough to take him off one objective as I press forward.
I’m going first.

That’s good for me, but I don’t make much of it – Thanks to a combination of orders, cover, and indirect firing penalties, I can’t kill any of Jason’s Kasrkin turn 1 and end up taking out Cadians in cover on the top objective instead – that’ll have to be where I make my stand. This means I’m going to really get hit hard by mortals on my Blightlords, but losing two out of ten isn’t the end of the world. I press forward and spread the sickness.
On Jason’s turn he absolutely teleports over to my side of the table and uses a mix of shooting to wipe out five Blightlords – not ideal, but I’ll manage. I retaliate by killing off his Kasrkin and taking out a Sentinel, and spread again to stay on target. That also helps me get the 3 bonus VP I need.

What follows is an extremely tight matchup where we go back and forth trading. For his part, I think Jason does himself a disservice staying dug in his Deployment Zone all game – I’m able to kill his mortars with my own, and he doesn’t get enough value out of the plasma on his vehicles to make me really feel threatened at midtable. As a result I’m able to press to his side of the table with Plague Marines and take down a banner from the north objective, holding him to 2 VP there for a number of turns. He’ll kill them, but struggle to put another banner up since doing so puts him in danger of giving me a charge and he can’t get enough Obsec models on the objective while the Plague Marines live.
The big moment for me happens on turn 5, when I’m able to bring my Deathshroud (2 models) forward, spread the sickness on the north objective, taking down the banner in the process. This puts me up 92-89 coming into the final turn. I can’t stop Jason from scoring 12 on Primary here, but I can stop him from killing my units. I hide everything I can in the top middle L ruin, then fire off Cloud of Flies in his Shooting phase – Jason can see a unit of Plague Marines but can’t shoot them until the Deathshroud are dead. Jason scores 1 VP for killing the Deathshroud and maxes on primary. He can’t kill my other, hidden PBC at this point and he’s already maxed Inflexible Command. We end the game 92-90 in a very close finish.
Result: 92-90, Win
This win is particularly great for me because it means when Scott asked me if I won I can tell him “yeah, Guard are basically free,” which will absolutely fucking send him. See, Scott has never beaten my Chaos armies in games we’ve played, even after the new codex dropped. And that’s fucking hilarious. Anyways, I do this while Scott is mid-game with Necrons. We’re up 3-1 in games right now but Scott’s game is very close. Thomas and Scott won their games but Norman got blown out so we’re behind on points. If we finish 3-2 but with a 50+ point deficit, we’ll still lose the round. It all comes down to a single roll in Scott’s game – he kills Cryptek, who then attempts to stand back up on an objective, only to fail the 4+ roll – and that narrowly wins us the round.
Round Result: 3-2 Win
Holy shit what an exciting finish and a hell of a round. That’s the closest game I’ll play all weekend, and I was sweating it by the end. It was basically impossible to keep Guard off 45 primary in that scenario, so my only chance was to try and keep him off 15 on banners – also very difficult and probably impossible if I hadn’t gone first. Note that if he’d scored 15 on banners, I’d have lost by 1 (though I might have gotten more Fleeing Vectors points… hard to say).
We grab some quick lunch. Our games went down to the wire and while we have more time with the event’s wonderful two-games-per-day schedule, we’ve already eaten into the lunch time. So I grab some of the world’s driest chicken fingers from the hotel concessions along with some tater tots. It’s… fine, but I end up giving a couple of the fingers to Norman.
Round 2: vs. We use to be OP
You can basically tell how hard a round is going to be on two factors: Name recognition and list comp. Recognize a name or two? You’re in for a tough match. See a fuckin desolators Space Marines list? Probably having a rough match ahead. We use to be OP are showing neither, and while we take all of our opponents seriously, we suspect they’re here more on the “have fun and roll dice” side of things.
Our Pairings
- Scott (Astra Militarum) vs. Maximiliano Cintolesi (Chaos Knights)
- Shane (Votann) vs. Jaco Ewart (Tyranids)
- Norman (Chaos Knights) vs. Zachary Juhl (Asuryani)
- Goatboy (Daemons) vs. Don Wojdacz (Adeptus Custodes)
- Me vs. Juan Botero (T’au Empire)
I forget how we paired here and for most of these. But I know I picked T’au because it’s a matchup I can win – especially when looking at Juan’s list. He’s got a relic 2-damage flamer and well, I live for 2-damage weapons my opponents spend points on. I’m also up for taking on the Custodes, but the T’au list is easier for me than most. It offers easy secondary points to Warp Ritual, I can tank most of its shooting, and it doesn’t have the mortal wounds output to really punish my Blightlord strategy. Plus it has enough small models I can pick them off with plague weapons and still score Fleeing Vectors. The drones alone are enough of a liability here.
Juan's list - click to expand ++ Arks of Omen Detachment (T’au Empire) [104 PL, 2CP, 2,000pts] ++ Sept Choice: T’au Sept + Stratagems + Stratagem: Heroic Support [-1CP] + HQ + Commander in Crisis Battlesuit [9 PL, -2CP, 205pts]: (T’au): Vectored Manoeuvring Thrusters, 1. Precision of the Hunter, Cyclic Ion Blaster, Cyclic Ion Blaster, Shield Generator, Stratagem: Emergency Dispensation, Stratagem: Promising Pupil, T’au Flamer, Thermoneutronic Projector . 2x Shield Drone: 2x Shield Generator Commander Shadowsun [8 PL, -1CP, 150pts]: 5. Exemplar of the Kauyon, 2x High-energy Fusion Blaster, Stratagem: Warlord Trait, Warlord Longstrike [9 PL, 160pts]: Railgun . 2x Gun Drones . . 2x Gun Drone: 4x Pulse Carbine + Troops + Breacher Team [6 PL, 95pts] . 9x Breacher Fire Warrior: 9x Pulse Blaster, 9x Pulse Pistol Breacher Team [6 PL, 95pts] . 9x Breacher Fire Warrior: 9x Pulse Blaster, 9x Pulse Pistol Kroot Carnivores [3 PL, 70pts] . 10x Kroot: 10x Kroot Rifle, 10x Quill Grenades + Elites + Crisis Battlesuits [21 PL, 440pts] . Crisis Shas’ui: Burst Cannon, Cyclic Ion Blaster, Iridium battlesuit, Plasma Rifle, Shield Generator Stealth Battlesuits [5 PL, 95pts] . 2x Marker Drone: 2x Markerlight + Heavy Support + Broadside Battlesuits [16 PL, 325pts] . Broadside Shas’ui: Heavy Rail Rifle, Stabilised Optics, Twin Smart Missile System Riptide Battlesuit [15 PL, 270pts]: 2x Plasma Rifle, Counterfire Defence System, Heavy Burst Cannon, Target Lock . 2x Shielded Missile Drone: 2x Missile Pod, 2x Shield Generator + Dedicated Transport + Devilfish [6 PL, 95pts] ++ Total: [104 PL, 2CP, 2,000pts] ++
. Marker Drone
. Marker Drone
. Crisis Shas’ui: Burst Cannon, Cyclic Ion Blaster, Plasma Rifle, Shield Generator
. Crisis Shas’ui: Burst Cannon, Cyclic Ion Blaster, Plasma Rifle, Shield Generator
. Crisis Shas’ui: Burst Cannon, Cyclic Ion Blaster, Plasma Rifle, Shield Generator
. Crisis Shas’vre: Burst Cannon, Cyclic Ion Blaster, Early Warning Override, Plasma Rifle, Stimm Injectors
. 2x Marker Drone: 2x Markerlight
. 2x Shield Drone: 2x Shield Generator
. 2x Stealth Shas’ui w/ Burst Cannon: 2x Burst Cannon
. Stealth Shas’vre: Burst Cannon
. Broadside Shas’ui: Heavy Rail Rifle, Stabilised Optics, Twin Smart Missile System
. Broadside Shas’vre: Heavy Rail Rifle, Stabilised Optics, Twin Smart Missile System
. Marker Drone
. Shield Drone
. 2x Gun Drones
. . 2x Gun Drone: 4x Pulse Carbine
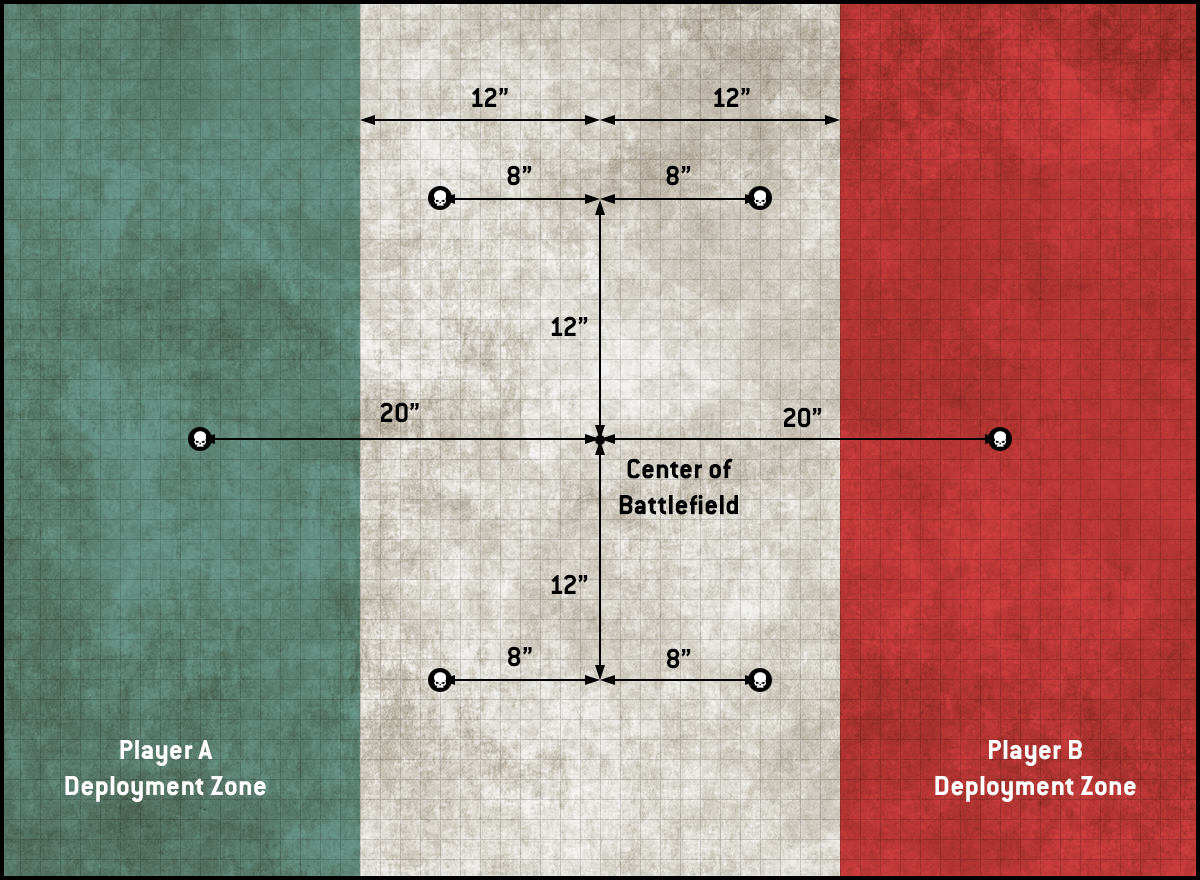
The Broadsides and Longstrike are a concern for my PBCs, but my hope is to keep them out of line of sight early and use the terrain to my advantage. The cross-shaped firing lines aren’t ideal, but the mission helps me out on deployment and they give me good lanes to cross for melee.
The Mission: Conversion
![]()
![]()
The corners deployment and shorter travel distances are a big benefit to me, as is the need to hold an objective in the middle of the table – that’s where my Blightlords want to live all the time. I drop my PBs back where they can hide and take advantage of dense terrain, then Juan drops his Stealth Suits in the upper left quadrant. I deploy a rhino right on the line in the middle of the table – he won’t have much which can see it turn 1 without exposing itself and I can pop smoke on it and tank a shot or two. Plus if it dies I still get the extra movement.
My Secondaries:
- Fleeing Vectors
- Warp Ritual
- Spread the Sickness
Juan’s Secondaries:
- Raise the Banners
- Assassination
- Engage on All Fronts
Ritual is free here and I think I can pretty easily get at least 11 on Spread. And as I mentioned earlier, the drones are a liability for fleeing vectors, where I can usually chase a wound or two on bigger units and turn them into dead models via drones.
I’m Going First.

That’s devastating for Juan, who needed to be able to come out and slow me down a bit. He redeploys his Stealth suits on the upper left back a bit, but only by a couple inches, giving me an easy T1 charge into them with Plague marines getting out of the Rhino – They only have to go 6″ to make the charge – and that means I’ve locked Juan out of one quarter and put threats close to him before his game even starts. I also pop some drones and a Devilfish while moving out with other threats. I don’t get Warp Ritual turn 1, but I’ve basically created a situation where I’ve got early control of the board and have pressed into three quarters, putting Juan on the back foot.
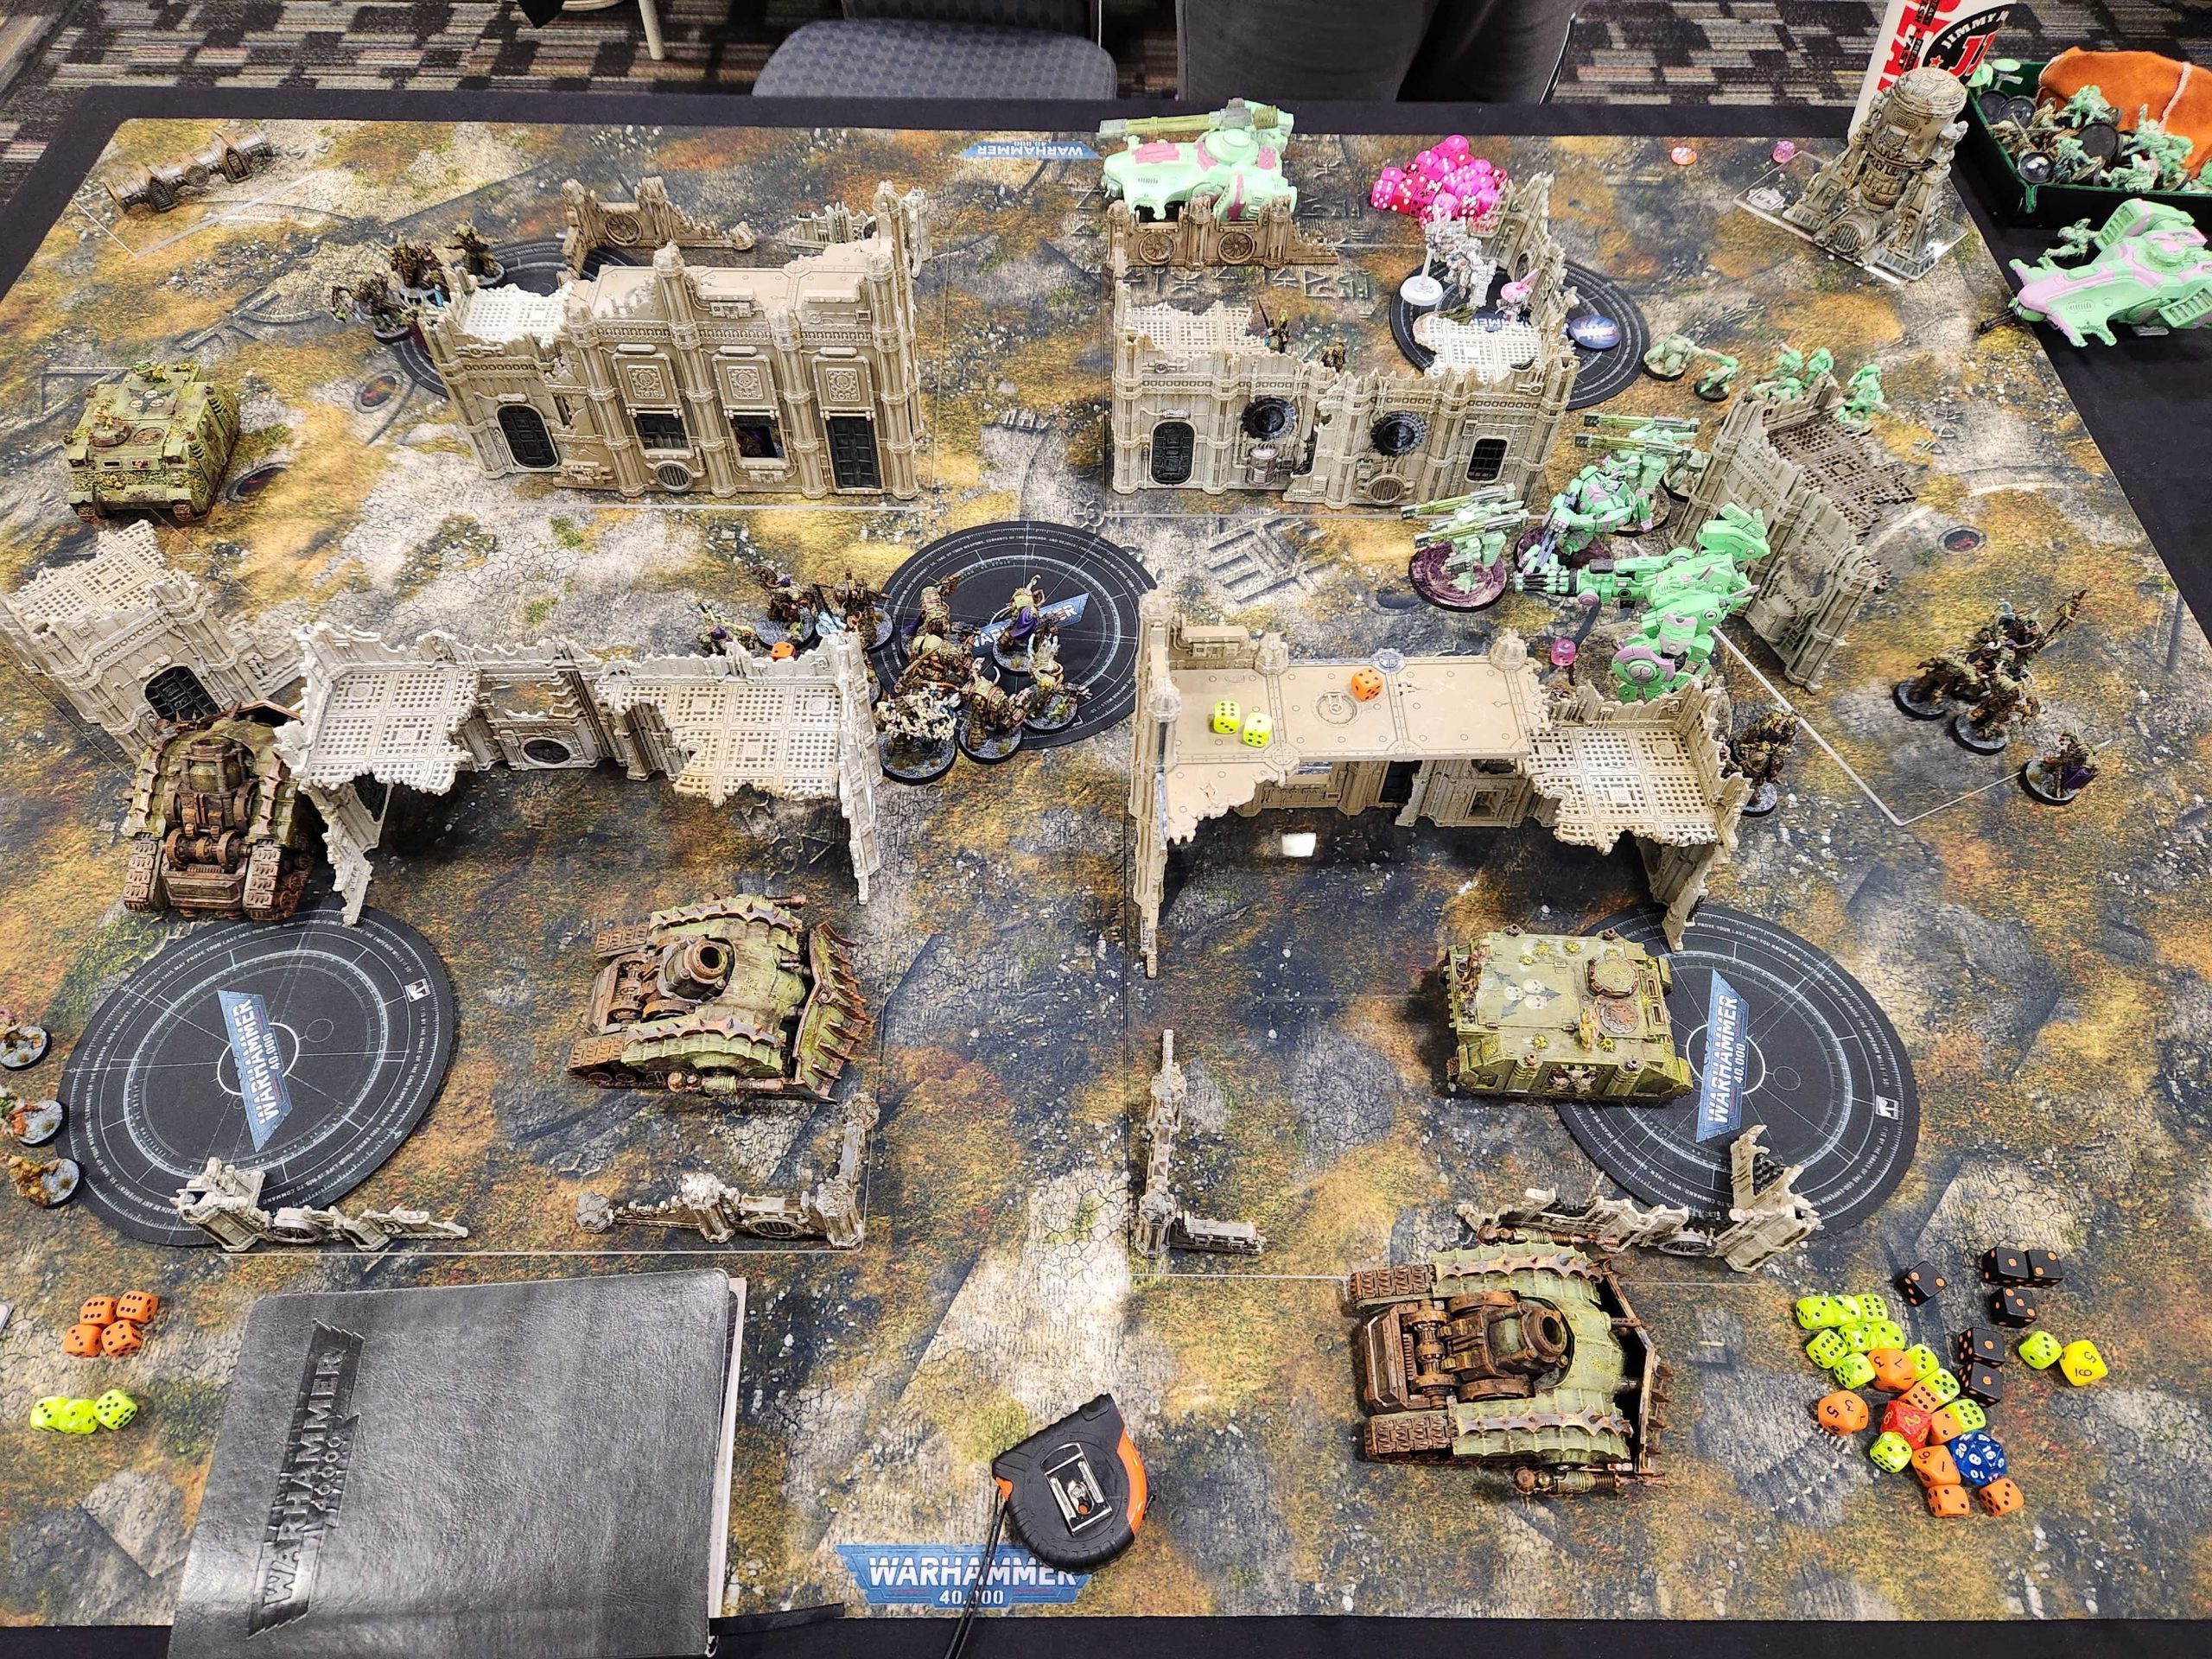
Juan steps out on his turn but isn’t able to do more than kill a couple of Blightlords. That leaves me free on my turn to step back with some Plague Marines and spread the sickness and work on screening his Crisis suits out from anywhere interesting. I’m also able to press forward and get charges off on Longstrike, and this turn will kick off a 12-4 primary deficit Juan won’t be able to recover from. I clear out his Kroot and some breachers, bracket his Riptide, and start bogging him down.

Juan will eventually kill a few things but by the time turn 3 and his Kayuon comes around he’s lost too much power and in too big a hole to dig out – the primary score is 30-12 at the end of round 3 and I’ll end up maxing Spread and Warp Ritual as I get my Deathshroud into Juan’s Deployment zone. Juan’s only able to put up a single banner and he’s not going to get any 3-point EoAF turns from here.
Result: 94-54, Win
This round was a clean sweep for us – Norman struggled early against the Craftworlds player and got a bit salty but was able to pull out the win. Shane’s opponent tells us jokingly(?) he’s not going to read Goonhammer any more. In all We use to be OP were a great group and fun to play and a mix of tough breaks for them and uphill matchups just didn’t pay off.
At this point we’re riding high – a 2-0 start is great for us and possibly more than we were hoping for, given our army composition. At the very least, 3-3 looks like our floor and 4-2 is very achievable.
Normally this is where I’d go to team dinner but with the wives in town and 8-person reservations being difficult to make, Scott and I have instead opted for a double date with the wives. We’re headed to Lidia’s an Italian restaurant about a mile from the hotel Their big thing is that they do an all-you-can eat menu item where they come by each table with one of the three pastas of the day and you can just have them ladle that onto your plate until you’ve been appropriately fucked up. The three pastas we have to choose from are a spicy shrimp pesto linguini, a tomato sauce and ricotta rigatoni, and the best of the bunch, a chicken-and-ricotta ravioli in a mushroom cream sauce that absolutely slaps. We order some wine and have a nice evening out, and the wives get to know each other proper. Fun fact: Both Scott’s wife and mine are mathematicians. They make plans for the following day.
After dinner we waddle back to the hotel and I hang out with the team in the event space for a bit – Nick and Gonyo are playing their 10th edition stream game and because Eldar are completely fucked Nick is steamrolling Gonyo trivially, even with a list that seems designed to not do that. Fun times. We crash around midnight and I sleep pretty well, all things considered.
Next Time: Round 2
That’s it for round 1 but I’ll be back in a day or two with round 2 coverage. Until then if you have any questions or feedback, drop us a note in the comments below or email us at contact@goonhammer.com.
