
Another month, another Infinity Tournament. This was a small affair (we ended up with 12 players after two unfortunate, unavoidable drop-outs) in Shrewsbury, which if you don’t know it is a delightful town and only an hour from my house! It has certainly had an Infinity scene in the past, I once lived in the area and used to attend a weekly club, and I’ve attended several tournaments there, but only pre-COVID. So this event is the attempt by Chris, a local Warcor and longstanding top bloke, to restart the local scene. He is actually the lone genius behind Monstrous Makings, a 3d design and printing service which makes some great conversion bits and gaming aids for Infinity. In fact I use his nesting 3d Silhouette markers and the magazines on my PanOceania guns were a commissioned series of custom prints from him. Well worth a look, and he has also just designed a nice acrylic laser-cut command panel for Orders, tokens etc – one was part of the winner’s prize for the tournament.
The venue was a nice gaming cafe, aptly called the Nerdy Coffee Co, which meant we had a ready source of refreshments, and the ticket price could optionally be increased to include lunch and/or a bacon roll in the morning! Can’t play games on an empty stomach.
Table of Contents
The Lists & Mission Analysis
The missions for this event would be Supplies, Supremacy and Decapitation. I had a hankering to play Military Orders again, building on my experience from last time, and saw no particular reason not to given that mission set. Since the first two require specialists and the third gives you no reason to take any but an objective to kill more than your opponent, I decided on one generalist list and one specifically for Decapitation. I also knew that both lists would include a Tikbalang. It’s up there with the Su Jian and Gator in my list of favorite-faction-favorite-pieces. So much fun to play.
List 1: Supplies & Supremacy
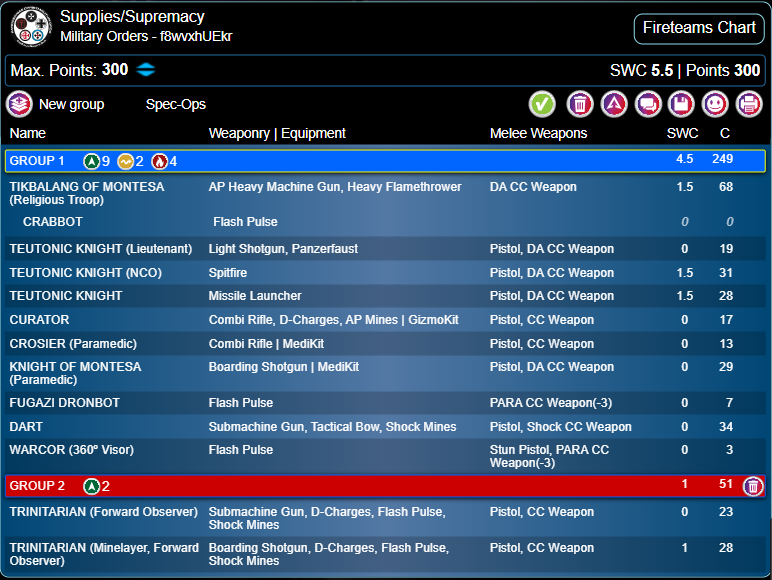
I basically wanted to use the same list I took last time for Biotechvore and Frostbyte. Those are very specific missions, but I thought that my relatively elite set-up would still be fine for dominating ground in Supremacy, and I had one great mission specialist for Supplies in the Montesa paramedic. Indeed the Crosier paramedic could also be dragged forward by the Teutons to score in that mission, and the Tikbalang’s Crab-bot pilot could try if it needed to and everything else was dead. I did make some small tweaks to previous experiences and the missions. I removed Mendoza for Dart and a Trinitarian Tertiary with SMG. I thought that ultimately Dart was nearly as effective a midfield killer, and with her Unhackable nature and MSV1, maybe a better complement to the Tikbalang. This let me have another model, more Hidden Deployment shenanigans and another specialist to cap objectives. Secondly, after much thought, I swapped the Trinitarian sniper for a boarding shotgun minelayer. I figured that capping the Supply Boxes, and scoring consoles or quadrants in Supremacy, would be the core aim of the games. As fun as a hidden sniper is, its role would be less important than those directly game-winning moves. I also wanted to throw some doubt onto which Mimetism-3 camouflage marker was Dart, but of course that is very unlikely against a savvy opponent. These changes did present a slight issue. Instead of a sneaky Hidden Deployment ARO in my second group, I now had two lonely Hidden Deployment mission specialists with no other orders to fuel them. I debated moving at least one into the first group, but eventually decided I should earmark 2 Command Tokens to move them if necessary, and that by deploying them next to Objectives, they would always be able to have one cheeky WIP roll to activate them at the point they revealed.
List 2: Decapitation
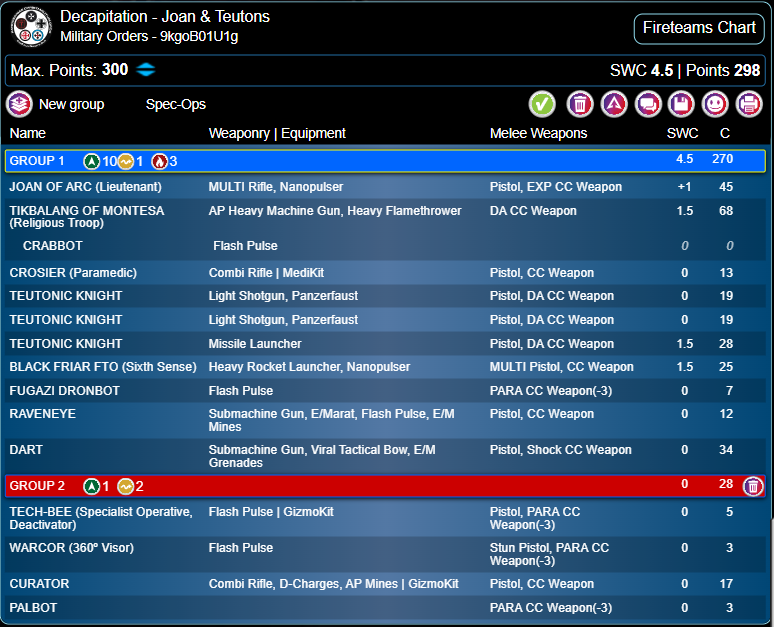
I have little experience with Joan, I don’t love the background idea and she’s a meaty Lt who is extremely tough but only effective within 16”, or 24” if you take the lighter armored and more expensive mobility version, which I think is less popular these days. That makes her vulnerable to counter-attack. I see her as a classic Round 3 fight piece, and I’d rather take a cheap, secure Teuton or perhaps a Knight Commander if I wanted to maximize NCO Orders. I think she’s still most commonly seen in Hospitaller pain trains, but that’s even less my style. I dislike ‘death star’ units in any game system, they reduce your options to play the game in interesting ways by concentrating your force into one place and one function. But ultimately she’s the toughest Lt you can take in the Sectorial, and once the Lt identity is Open Information, as in Decapitation, that makes her the most secure. You can also make her your reserve deployment piece to avoid alpha strikes if going second, which is tricky with a Lt who slots into a Fireteam. So I thought this would be a good time to try her out. Of course she is accompanied by her faithful Warcor and Tech-Bee for cheap Regular Orders. Since I was still including the Tikbalang, I naturally supported it with a Curator, and included my usual Teuton/Crosier Fireteam. This time I went with a Black Friar HRL alongside my Teuton ML, partly to defend against smoke-rushing warbands and partly because the Teuton spitfire is much less attractive when you have an alternative use for the Lt Order. Finally I took Dart as in the other list – if a Tikbalang couldn’t get to a Lt or Designated Target, hopefully she could.
Game 1: Supplies
Pre-Game & Deployment
I drew against a first time opponent, a nice guy who was actually from Birmingham, although nowhere too close to me, and had played off and on since N2, same as me. He was also using Nomads, which fortunately I am familiar with. He won the roll and elected deployment – in my opinion a mistake, especially since he had a fast panda Heckler and a Guided ML remote. I think if he’d gone first and done things right, only luck could have saved me from a debilitating first turn strike. I naturally chose to go first, planning to be as aggressive as possible with my Tikbalang and Dart, so spent a command token to hold them both in reserve.
I deployed my Teuton Fireteam on my left with some diagonal fire lanes into the center of his DZ. I hid my Trinitarians behind the left and central Objectives, with the mine on the right, just about covering that Objective. The Montesa knight was on the right, and I kept him Impetuous, thinking he’d be my most efficient way to seize that right hand Objective if needed.
My opponent deployed a variant on the common meta Nomads stuff. He had the usual GML/Heckler combo, with Jazz and Zoe as his hackers and the ubiquitous pair of Moran Masai. He also had a Salyut EVO remote, some Morlocks, the Puppetmaster with 3 bots, and a Daktari. Unusually there was no Chimera and a Taskmaster was his only big direct gun, and I could see it was his only valid Lt. Now it was in a clump with the Vertigo and Salyut Zonds behind a big building on my left, so that was my main target.
I deployed both the Tikbalang and Dart at full extension on my far left. My plan was to shoot them up the board, have Dart clear the Salyut since it was a Repeater, and then HMG or flamethrower with the Tikbalang to clear these priority targets out. That would leave me clear to either mount the building, or simply move right to the enemy table edge, and mow down Jazz, Zoe and the Puppetmaster in his center. If all went to plan, a devastating alpha strike. My opponent had a TR bot as his reserve drop and put it on that same building, starting in LoF of the Tikbalang. Not an ideal choice IMO, a Moran Masai would have been a better reserve to delay my opening rush. But we shall see how it worked out.
Round 1
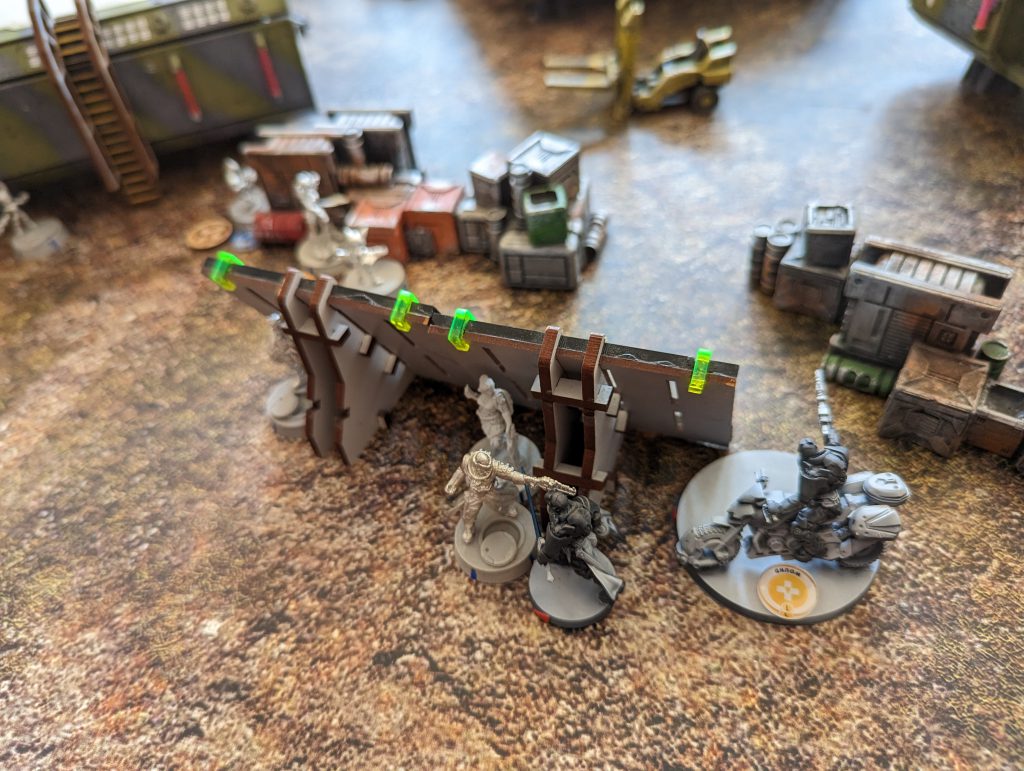
I did move my Montesa straight forward with his Impetuous Order, then idled, because further movement would get me into a Moran’s ZoC and hence into the enemy Hacking Area. Possibly I should have counted the Orders needed while executing my bold plan! My opponent sensibly docked me 2, which left 7 Regular Orders, 2 Irregular (the Warcor and Mission-specific CSU) and a Tactical Awareness Order for me to play with. I immediately sent the Tikbalang forward at the TR bot, and it did take a bit to put it down – we both crit the first time, then he took 2 saves but passed both, then finally I put him down, but not out, and he had Zoe’s servant remote behind him. I continued to manoeuvre forward, shot a Moran from long range, and he passed a Dam 16 ARM roll in the open as well! Cursing my luck, I moved Dart up and coordinated her with the Tik to get her past the Moran and his Crazy Koala. My opponent Discovered, but failed, and this time the Tik killed the Moran, while moving just outside the Repeater area. I eyed my diminishing Order stack, moved Dart again, then jumped the Salyut and just, just put it down.
![]()
![]()
Tik time, or so I thought. I moved up and spent my remaining Orders to very little effect. The Taskmaster just kept passing ARM rolls, maybe 5 or so? By moving further and splitting my Burst I did manage to kill Jazz, but I didn’t even touch the Vertigo Zond, since I was prioritizing the enemy Lt. This led to me passing the Turn having got a Moran, a remote, and Jazz, but not inflicting the blow I’d hoped for. Critically, my Tikbalang was now within 1 Order of the Heckler’s Fast Panda, upon which Zoe could get me, and I had blundered enormously and spent all my Command Tokens – 1 to hold two models back, 1 to coordinate movement and 2 to convert Irregular Orders for the Tik’s use. One of my classic recurring errors, aggressive over-reach. Shameful.
I finished by revealing a second-group Trinitarian in the central building, since it seemed quite safe barring a lot of Orders I didn’t think my opponent could spare, and successfully extracted the Supply Box.
Impetuous moves, my opponent advanced a Morlock on his left, but the two he had in the center were pinned down by my Teuton ML and chose to stay put. He quite rightly went to deal with the Tikbalang as his first priority, but fortunately for me he made two straight up mistakes while doing so. Sorry to point it out with the benefit of hindsight. First, he move-moved his Heckler, which mystified me because he could clearly place his Fast Panda to affect my Tikbalang without spending another Order. Then he spent another Order and moved into LoF of the Tikbalang, in line with his Vertigo Zond and Taskmaster, inside my flamethrower range, before throwing down the Panda. I naturally ARO’d, burning the Heckler and Vertigo to death and putting a wound on the Taskmaster. Honestly I feel quite bad that I didn’t make him take it back and do the maneuver correctly. I asked him why on the spot, and he explained that he isn’t confident at eyeballing distances and didn’t know if he could get the Panda into range without moving around the corner. So yeah, I should have let him take it back. He lost 2 models and a wound on his Lt (easily could have lost him as well) for no reason. Sorry.
The second mistake was that he Oblivioned my TAG with Zoe, getting it on the first attempt. That would normally be a winning move, with my Engineer on the other side of the table. However I had no Command Tokens and no hackers – he could have Possessed and it would have been incontrovertible, giving him a damn good mobile gunfighter even with the reduced BS of 12, and possibly letting him finish me in the subsequent rounds. Instead, he used Total Control as a follow-up, which is still fine since it effectively killed my Tikbalang while granting a dangerous, if static, ARO to inhibit my future moves. But it could have been far worse.
Having at least dealt with the threat, my opponent used his wounded Taskmaster to go after Dart. I think this was also a mistake, he could have looked to send a Morlock after her, or at least placed a Koala before beginning the FtF rolls. Possibly his Order pools made those options impractical. In any case, due to Mimetism-3, my opponent was on 4x 7s with his Red Fury vs my 13 using a tactical bow. I rolled better, he took 2 ARM rolls on 6+ and failed both, straight up dying! To be fair even one failure would have put him down. This meant a loss of Lieutenant situation for his Turn 2, really catastrophic, especially since it freed me to be mindlessly aggressive once again. My opponent repaired his Reaktion Zond with Zoe, achieving his Test Run classified, and then tried to take on my Teuton ML with a Puppetbot AP marksman, but was outside of 24″ so couldn’t accomplish anything except taking a wound.
Round 2
With the Tikbalang gone, I was torn as to what my best options were for further attack runs. I decided Dart was my best chance to kill his TR bot again, then attack his key remaining models, Zoe and the Puppetmaster, in the center. Unfortunately she was covered by the now-hostile Tikbalang! I moved around the corner, the TAG flamed, I tried to Dodge. Failed the Dodge roll (aiming for a 13) and 2 consecutive saves, burning to death. Grim, but I can’t complain given how much worse the consequences of my blunder could have been. I revealed my other Trinitarian, not to try the Objective but to attack the TR bot. I was using an SMG at +0 range, he was on -12 to shoot so had to Dodge, failing. However it made one or two saves and survived. I activated my Fireteam and the Teuton ML had better luck, removing both the TR bot and its engineering servant with a template.
This led me to my backup attack run, the Montesa knight. Casting his paramedic kit aside, he simply went berserk and charged the enemy. Moving into the center of the table, skirting the Moran’s ZoC on my right, he had to Dodge against a Koala and shots from the Moran and CSU for a couple Orders, which he did like an absolute hero, instead of fluffing it and dying to the first two rolls, which is the normal result when I try to trust in speed and armor. This brought him into range for one more, very silly, move-dodge Order in the face of 2 puppetbots, as well as Billie and a Morlock firing pistols – he dodged them all. There was another key error here, my opponent and I both forgot that Billie’s repeater would have given Zoe a potentially run-ending Oblivion ARO. I offered to walk it back when we caught it later in the turn, but my opponent chivalrously declined, opting to play things as they lay. Then I spent yet another Order where the Montesa took the same 4 AROs but was in the face of Zoe and the Puppetmaster, firing his shotgun at them in hit mode on 19s. They got their own AROs but chose to Dodge, as did another Morlock facing the wrong way, so technically I provoked 7 AROs at once, a real rarity in serious play. This time, the Montesa took 1 wound, and actually both targets survived! Vexing, but I had an Order or two left and tried again, walking into melee with Zoe to force a reaction. This time, I put down both of them using the templates, and the Montesa even survived, while being Isolated by Zoe. I used my CSU, since I couldn’t convert its Irregular Order, to attack and put down a rogue Morlock on my right.
His Turn 2 saw my opponent on the back foot. He was in Loss of Lieutenant, and effectively (because the Puppetbots were now in a null state) his only active models were his Daktari, 2 Morlocks, Billie, his CSU, and a Moran Masai. Here we made a rules mistake, looking back it’s clear he must have been in retreat, and the game would have ended early, with me only holding one Supply Box. For some reason we missed it, perhaps because he had rather more models on the table, but Disconnected. He attacked my Montesa in melee with a Morlock, but lost the coin flip FtF roll and died. The rest of his turn was maneuvering his remaining Moran Masai to try and extract the Supply Box on my right, but again he ended up dying in ARO.
Round 3
Isolated but still furious, the Montesa spent his Impetuous Order getting to melee the Daktari and beating her unconscious. With nothing much really left in the way of opposition, I extracted the left hand Supply Box with my other Trinitarian, then brought my Teuton Fireteam across the board so the Crosier paramedic could get the right hand box. Looking at the Classifieds, I had drawn Predator and an unachievable (no hackers) Data Scan, so I ensured I was securing the HVT on my far left with my Curator, and my Teutons went in search of a second melee kill, eventually finding a disconnected Zondbot in the far right corner and beating it to death with my last Order. In retrospect, my Montesa still had his single Isolated Order and could probably have done it by flogging a nearby Unconscious model.
My opponent just passed his final turn, since he realized he was in Retreat and none of the Objectives were achievable.
Summary
Well, it finished 10-1 to me, with 198 VP remaining to my opponent’s maybe 30 or 40. I think this was a game where I made big mistakes, but perhaps fewer or just less unluckily than my opponent. My opening plan, Tik kamikaze, was broadly viable, and maybe unlucky not to achieve more, but it was incredibly stupid of me not to hold one of my Command Tokens back. If my opponent had not made some errors in his hacking counter I would have given him a game winning advantage. As it was he took more significant casualties in his own Turn 1. I would note that even if I’d had a Command Token, he could have dealt with the Tik via smoke and a Morlock as well. The other big points where simple errors decided the game were the Montesa attack run, when we missed a very good chance for Zoe and Billie to stop my rampage, and the simple fact that it should have ended in Round 2 with a low scoring win for me.
Game 2: Supremacy
Pre-Game & Deployment
Well, I drew against Steel Phalanx, in the hands of a very good, keenly competitive player. I had a terrible sense of deja vu from my last tournament, where this fixture in the second game did not turn out well for me. Steel Phalanx is a top tier competitive faction in general and a very bad match-up for MO in particular. They mostly rely on shooting with good stats but few gunfighting mods, and pay for some decent close combat ability. That lines up badly with Phalanx’s massed Mimetism-6 and rather better close combat (featuring normal and eclipse smoke grenades). Basically it makes me feel all jealous and salty, which hopefully I didn’t communicate to my opponent, who was a great sportsman. Possibly I should have taken my other list for the Black Friar, but ultimately I wanted the Trinitarians to achieve the core mission objectives in Supremacy.
From bad to worse, I lost the Lt roll again and my opponent picked deployment. I consider Supremacy a go-second-to-win mission, so accordingly I deployed first and prepared to receive the onslaught. He had the standard stuff: one team of Phoenix, Machaon, Ajax and a Myrmidon, one team of Acmon, Eudoros, Pandora, backed up with a few cheap support orders and a Hidden Deployment piece.
Round 1
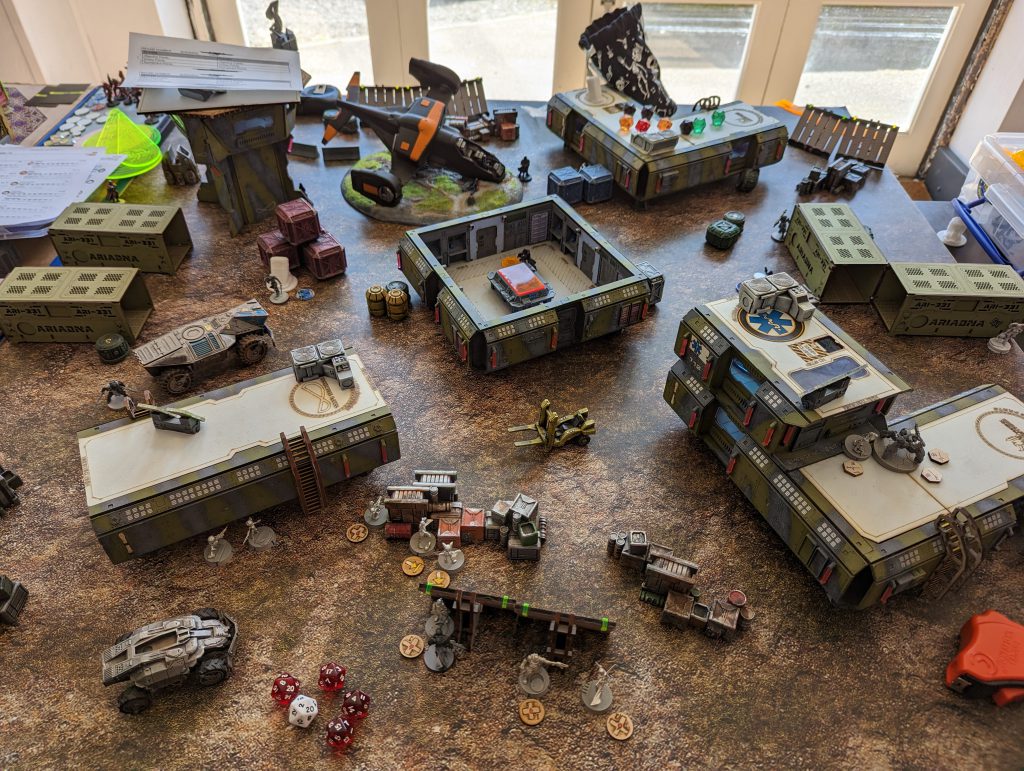
My opponent, after considering the risk and possible impact carefully, opened with a straightforward shot from Phoenix against my Teuton ML. He was within 32″ so had 3x 14s vs my 2x 8s. Definitely a decisive advantage and in my opinion he made the right choice to try and save Orders, and start dominating the table, by confronting it head on. A good example of how deployment disadvantage cost me. While Phoenix was one of his two reserve drops, the Hidden model being the other, it was very easy for him to pick his spots to engage during deployment. In the event, it couldn’t have gone much worse, as I failed both rolls, Phoenix hit all 3 times, and the Teuton went down.
Further Orders saw Ajax shoot up the table along my right flank, accompanied by a Myrmidon and Phoenix, dropping Machaon (clearly his Lt) off in safety and easily clearing my Trinitarian’s mine. Reading my DZ, I had deployed so that the first unit they would encounter was my Teuton spitfire, closely backed up by a Warcor and the Tikbalang. I’d cunningly positioned the Tikbalang so that it wasn’t possible for Ajax to squeeze past the Teuton and get it in melee. In retrospect, had he spent a couple more Orders moving around this massive building-topped rock terrain piece, Ajax probably could have used smoke and directly taken on the Tikbalang, which might have worked better. In fact he engaged the Teuton with his heavy pistol, but I successfully dodged away, ensuring I broke LoF to avoid Berserk. My opponent pondered and revealed Atalanta, way back in his DZ, to shoot at the Tikbalang from across the table, but I passed ARM rolls and ducked into cover. Perhaps I lost one STR. Returning to Ajax, he put smoke down and moved closer to the Teuton, but I dodged again to ensure that he couldn’t reach melee while remaining hidden in the smoke. He moved Phoenix up in the open and could see the Teuton spitfire in his new position. I considered shooting the Myrmidon normally, but did take the FtF ARO and luckily wounded Phoenix. Bonus! Almost out of Orders, Ajax came barrelling out of the smoke and engaged the Teuton, either tanking the Tikbalang’s flamethrower or taking a single Wound, and putting the Teuton down. I’ve got something a bit wrong in my recounting here, because he killed my Curator at the same time. With his nanopulser? But the Teuton definitely went down to a melee hit, and I don’t remember taking 2 flamethrower AROs with the Teuton, which I would have done had this been two separate orders. The point is, my Core Fireteam was down to just the Lt and paramedic at the end of the Turn. Not very nice for my 12 model list, but potentially survivable, since the Teuton ML and. NCO were both only unconscious and could perhaps be revived.
![]()
![]()
The other upside as I began by first Turn was that Ajax, one Myrmidon and Phoenix were badly exposed. I managed to get Ajax with the Tikbalang but it took maybe three Orders. Disaster then struck, I tried for the Myrmidon and he successfully threw smoke, blocking the Tikbalang. I blame myself for engaging within 16″, so on 4x 9s. I could maybe have moved back further and made the FtF roll more advantageous. As was, I tried to deal with Phoenix by revealing a Trinitarian in my right hand near quadrant, moving away from the Console (I couldn’t reveal there anyway yet, since Atalanta was covering it) to get behind Phoenix. Unfortunately I seemed to have misconstrued which way he was supposed to be facing, since my opponent adjusted him and back-shots were no longer possible. I revealed anyway, tanking a nanopulser from his CSU in the process, and getting two shotgun blasts past his surprised Dodge into Phoenix. He passed both saves, and failed Guts into the Myrmidon’s smoke. Bugger.
This second failure meant my opponent effectively controlled my right hand near quadrant for Round 1. I couldn’t outpoint Phoenix except with my Tikbalang, which would have meant losing it early in Round 2. So I had to take a random risk, moving my Trinitarian into his table half, tanking another nanopulser template from his CSU while double templating him to death. Phew, that at least restored the quadrants for the Round to one each. In the final icing on top of my cake, I tried to paramedic my Teuton NCO, failed the PH14 roll and killed him. I used a last Regular Order to put my Tikbalang into Suppression, covering Phoenix and the Myrmidon for when the smoke cleared, and then made a significant mistake by moving my Warcor into position to offer them a further ARO.
![]()
![]()
This Turn was really when the game slipped out of my control. The losses from the enemy Turn 1 were recoverable. But by failing to kill Phoenix and the Myrmidon, who frankly I thought were dead meat, I was leaving a big problem for the Second Round, failing to get points for more quadrants – which is the whole point of going second in Supremacy – and meaning I couldn’t get my Tikbalang into position to engage Atalanta within 32″. I knew that having only inflicted 2 casualties on the Steel Phalanx in my counterattack, and having lost my main long range ARO, I was in trouble for the next Turn.
Round 2
I had no idea. With a full stack of 10 Orders, plus NCO and Tactical Awareness from the terrible twosome of Eudoros and Acmon, my opponent was able to go on an unrestrained rampage. First, Machaon actually used his own Lt Order, efficiently peeking out at my Trinitarian in his take half, and rather luckily gunning him down in a single FtF. Then Phoenix decided to risk a trade for my Tikbalang. My opponent had picked up on a mistake, I had my Warcor standing too close. So Phoenix tried FtF shots at the Warcor, knowing any hits would affect the Tik, and my only way to try to avoid them would be to Dodge and lose Suppression. I fired back with the Tik. I believe the Warcor died, the Tik took another point of STR damage and went to 1 remaining. Phoenix took two APHMG hits to the chest….and made both saves. I hate that guy.
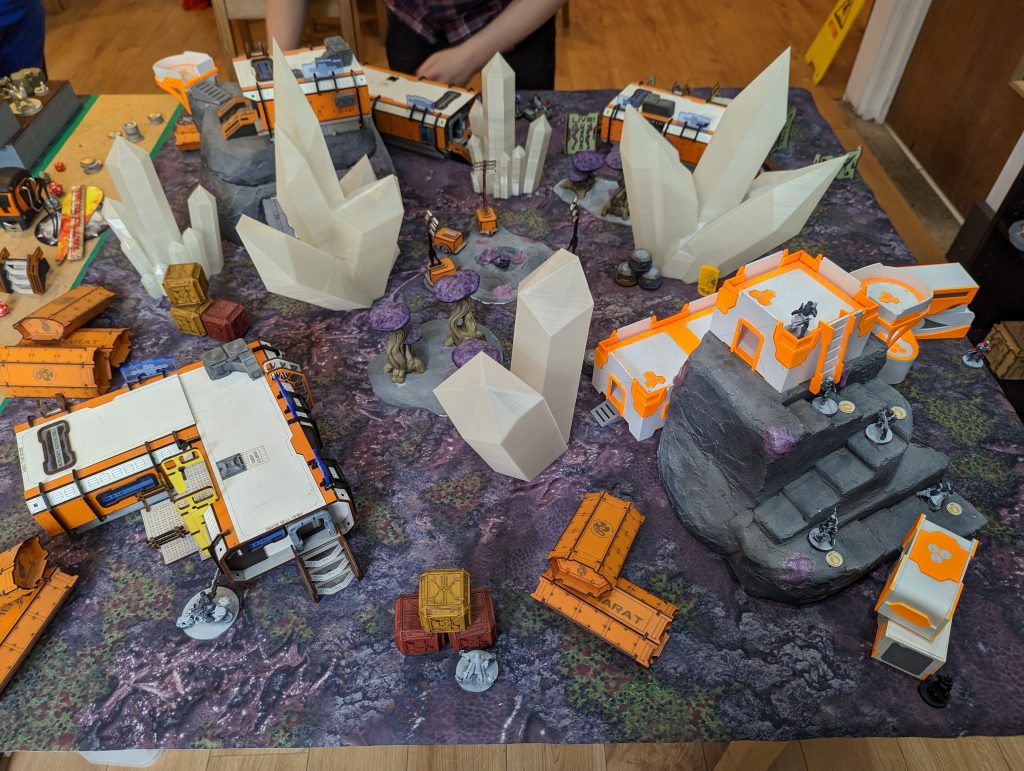
On my left flank, Eudoros and friends sprang into action. Pandora activated a console while they moved into my table half, toward Dart and my Secret CSU sheltering in a building. Eudoros threw smoke, covering himself and the doorway, so it would affect both my models as well when the door opened. He then started a new move Order with Eudoros as the team leader. Here I made a decision I’m conflicted about, but was probably a mistake. I revealed my SMG Trinitarian, trying a shot at Pandora. This could have theoretically killed her, as she’s NWI but not Shock Immune, and it did make my opponent think a bit. But he dodged the whole team, and Pandora has Dodge(-6) so escaped fairly easily. He then dissolved the Fireteam, used Eudoros solo to kill the Trinitarian, who has no direct template, then moved back and killed the Secret, who I’d dodged to block the doorway to Dart. He was then able to move Eudoros again, and declare Intuitive Attack with a nanopulser against Dart. I knew that if I dodged, even successfully, I would be killed in melee in the next Order, so I held still and prayed. Of course he did pass his WIP roll and Dart took a wound, before being finished off in the next Order.
![]()
![]()
My opponent reformed his team, moved Acmon and Pandora back into hidden positions (remember this is on the left half of the table from my point of view) and sent Eudoros right to my DZ after the Montesa biker. I fluffed my dodge, he hit all 3 times, and killed the Montesa in one FtF. I now had nothing left on my left side, Eudoros having killed 4 models and slightly over 100 pts. It’s very difficult to separate my confirmation bias on this, but I don’t see how he can be quite this good. Sure, Eudoros is an excellent piece who cheats the CB points formula in all the right ways and has perfect support available in his faction. But I seem to be under some curse where whenever he contacts one of my models, he will invariably knock them out in one FtF. As I say, probably confirmation bias, he is of course a powerful unit, my opponent played him well and I didn’t put up any particularly difficult AROs for him.
This left me in my Turn 2 with the left hand quadrants completely under enemy control by tough models I had no options to attack. On my right, I still had Phoenix and a Myrmidon, who were my natural targets, with Machaon and some light units hidden further back. Unfortunately, Atalanta was in the center of my opponent’s DZ watching the area. With the Tikbalang my only real option, I managed to kill the Myrmidon and spent several Orders engaging Phoenix, but he simply wouldn’t fail a dodge – fair enough as my attacks were not a very good option here. Running out of Orders, I had to engage Atalanta and was lucky to get a 3 hits on her over 2 Orders. You guessed it, she passed her all her ARM rolls. Finally, Phoenix used his nanopulser rather than dodging, my Tikbalang immediately failed the BTS roll and dropped. With most of my force dead and all four quadrants in the hands of Steel Phalanx, the Round ended.
Round 3
I was clearly going to be in Retreat at the start of my Round 3, and my opponent had little to do. We rolled it out and determined he could activate two more consoles, and Phoenix was still securing my HVT, so we agreed to call it there. I didn’t take my third turn, since I would have been unable to score 2 quadrants or to get any consoles – Atalanta and Phoenix had me locked down. I could have rolled a Lt panzerfaust shot at one of them for spite, or sacrificed my Crosier paramedic to try and bring my Teuton ML back and try the same with him, but honestly it wasn’t worth it.
Summary
The game ended 9-1 to him, only the drawn quadrants in Round 1 preventing it from being a total wash out. I had a mere 42 VP remaining to his 245 – Ajax, one Myrmidon and the free Secdet CSU being his only casualties. I am developing real trauma about facing Steel Phalanx. I was discussing it with my opponent and he thought the HRL Black Friar would have been very useful. Yes, but I’m not entirely a fan of it. Engaging Phoenix, for example, we’d be on even dice, except the active player would have Burst 3 to the reactive Burst 2. Hardly something to count on. I do think a more aggressive medium range piece like the MSV2 Crosier spitfire, or even the multi rifle Black Friar, could have helped. In this game, the elite close combat models with their combination of Mimetism, multiple wounds and good dodges and/or smoke, just proved very resilient in the reactive turn. I needed some better way to clear them off at close range. I also yearned for the asymmetric solutions Nomads offer, hacking in general but definitely the guided missile system.
I certainly need to think about the tools I pack into my lists, and there was some pretty extreme luck, especially in the ARM rolls on Phoenix and Atalanta, but I shouldn’t take away from my opponent, who played a strong list very well, making no real mistakes. He would go on to deservedly win the event. I made a couple errors: I revealed my Trinitarian SMG in a vain attempt to stop the unstoppable object that is Eudoros. I didn’t maneuver my Tikbalang well to get maximum advantage (ie >16” range) against Phoenix and his Myrmidon buddy in my first Turn. I should have looked to deploy my Teuton ML in a position with horizontal fire lanes across my DZ, not right across the table, when I should have known Phoenix would be likely to kill him. That last one is maybe a bit more defensible, as I was worried about Penthesilea as a reserve drop, and a beeline attack run at my Tikbalang.
I’ll get them next time. When Agammemnon said “of all the warlords loved by the gods, him I hate the most” it wasn’t Achilles he was thinking of, it was Eudoros!
Game 3: Decapitation
Pre-Game & Deployment
Battered and bruised, I went into the straightforward aggression of Decapitation with some relief. Chris is an experienced TO and follows the best practice of putting the simplest mission latest in the day, a relief to his tired pilgrims. I drew against Imperial Service, and lost the Lt roll for the third time. My opponent hesitated before correctly selecting to play the first turn. This was a bit of an indicator to me that he wasn’t the most cut-throat competitive player – first turn is generally accepted to be a significant advantage in Decapitation. My conviction grew as he deployed a very un-meta list: he had a Core fireteam of just Kuang shi and a Celestial Guard, no firepower piece, and two Haris teams, one of three Bao troops including a sniper, and one of a Hsien HMG, Pheasant KHD and Adil in Crane Armor (his Lt). He also had a Rui Shi and another Celestial Guard with smoke. Clearly my opponent was all in on the smoke-shooting tricks, but I didn’t see that much to fear in his list for the Tikbalang, or for Joan.
I deployed a fairly strong ARO presence, with both Teuton panzerfausts, the ML and the Black Friar HRL all looking out on my left, and the cheap flash pulse orders covering his Kuang Shi team on my right. I was perfectly willing to take my chances against his firepower in ARO, and go on the counterattack in my own turn. The table was something of a Tikbalang’s paradise. A decent number of two-storey buildings, but not a huge building footprint, and a lot of very small scatter terrain pieces, the kind that can hide a model, but not keep it safe from a S6 TAG climbing on a nearby roof. My opponent dropped a Kanren as his reserve, behind a building on my center-right, and I placed the Tikbalang opposite, looking out, so that he couldn’t approach unobserved.
Round 1
We kicked off with the Hsien HMG being shrouded behind smoke (on the second attempt – with B1 and no range bonus, a non-fireteam smoke grenade launcher is an inefficient tool). He spent perhaps 4 Orders engaging my Teuton ML, on 5x 14s to my 2x 14s, losing one of the FtF rolls and taking a wound, while I made three ARM rolls and stayed standing thanks to Religious Troop. Eventually he rolled 2 crits and a hit, and that time my Teuton went down Unconscious. Oh well, he did his job. Between the strategic-use Command Token penalty and that, his turn was very blunted, and he made what I believe to be a mistake, moving his Kuang Shi forward without a very clear aim. This just exposed them to counterattacking fire. I really think he should have tried to lock in at least one Designated Target, if he couldn’t kill any of my models, but that might have been tricky. Finally he risked his Rui Shi head-on at my Black Friar, taking AROs from a panzerfaust as well. Despite being just within his good range, he did lose the FtF and died.
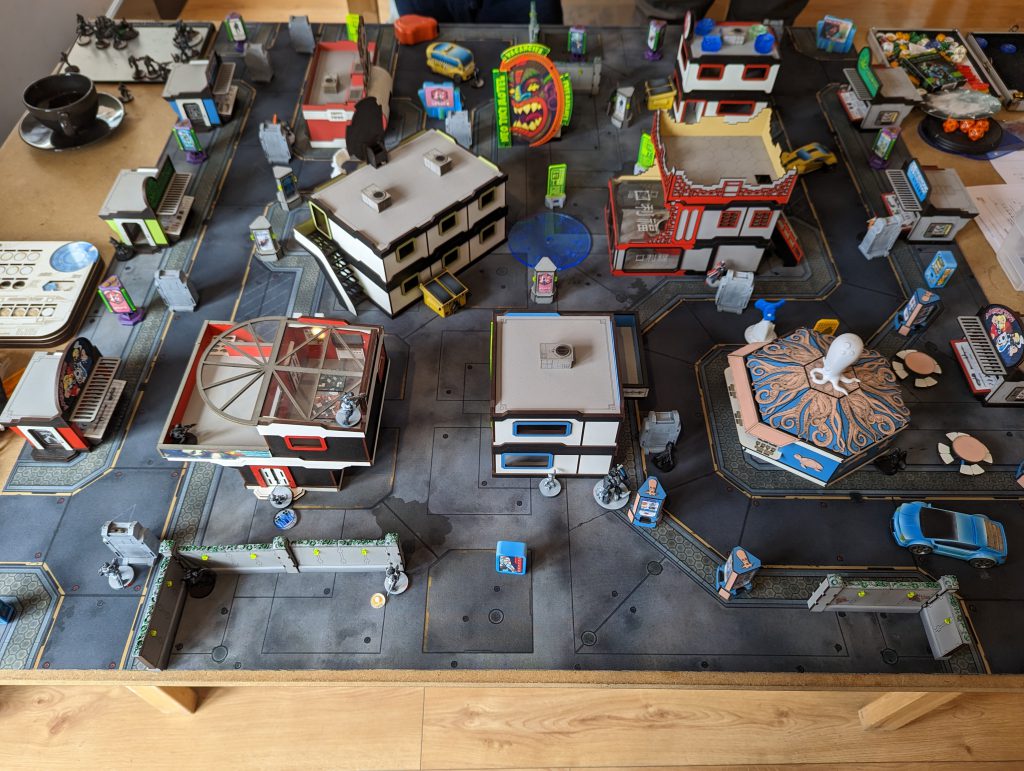
I was rather confident going into my first turn. I’d only lost my Teuton ML and the Tikbalang had a lot of targets. It engaged and killed the Hsien before mounting a building and taking out a Celestial Guard and a Bao troop. This let my Curator, of all people, far over on my left flank, stand up, move, gun down a Designated Target, and retreat to cover. On my right flank, Dart emerged from the building I’d deployed her in, and similarly cut down the other target. The Tikbalang pushed up again, eliminating the other Celestial Guard and a couple of Kuang Shi with cross-board shots, spying the Kanren round a building and annihilating him, and finally coming up against the other two Bao troops. Here, disaster nearly struck as I lost a FtF and had to take two ARM rolls – I rolled a 1 and a 2, going down to 1STR remaining! Fortunately I was able to spend another Order and kill the Bao sniper, leaving one model from that team still active. Finally I repositioned my Raveneye officer to protect my right-hand DT, and spent Joan’s special Coordinated Order to place the Tikbalang, Raveneye and Joan on Suppression Fire.
![]()
![]()
Round 2
My opponent, who was a really lovely guy, had lost I think 9 models by the start of Round 2. He had a Bao troop, Adil, a Pheasant, and a couple Kuang Shi remaining. Not a promising situation. We discussed his options and determined his only real opportunities to score Objective Points were my DTs. His Kuang Shi tried to get at the one on my right, but the Raveneye’s shock ammo SMG proved invaluable in suppression and stopped that. On my left, the surviving Bao Troop, a boarding shotgun, snuck under my Tikbalang’s building and drew a bead on my other DT from within 16”, scoring two hits. I passed both ARM rolls, and failed Guts back into total cover. The Bao then advanced suicidally into view of my Core Fireteam to draw LoF again, hit the DT again, I passed my ARM rolls again, while the Bao was barbecued by my Black Friar (try saying that ten times fast). Frustrating! My opponent should certainly have got onto the scoreboard there.
![]()
![]()
With only a couple enemy models left, my damaged Tikbalang moved in for the kill. I moved right into the enemy table half and drew a bead to both Adil and the Pheasant. Adil took a wound while the Pheasant passed ARM and Guts Rolled prone out of sight – Adil unfortunately had nowhere to go within 2”. I fired again and he dropped.
Round 3
With only the Pheasant Agent left alive, and therefore no way to strike at me or score any points, my opponent agreed to call it quits there. He very nicely allowed me to dip into my Turn 3 so I could try to paramedic my Teuton ML, and in this game, when I didn’t need it, I was able to pass my PH14 roll.
Summary
That left me on a 10-0 win, with a perfect 300 VP remaining to my opponent’s 28. This was a sort of perfect storm of match-up and table. I don’t want to kick my opponent when he’s down, but I don’t think he was well versed in the competitive environment, particularly the principle that everything, bar a few entirely sacrificial or extremely formidable models, has to hide outside of LoF on the Reactive turn. Leaving valuable shooters, or Order-battery Kuang Shi, where your opponent can engage them from range is just asking to lose them. Of course this gets far worse when your opponent is using something like a Tikbalang, which won’t often miss, and can move quickly from target to target.
Conclusion
I had a nice day out at the event, saw some friends, enjoyed the atmosphere and general immersion in Infinity. The full tournament results can be seen here. The event was won by my Steel Phalanx opponent from Game 2, with Tohaa in second place and me in third, since it was such a small event. I have to say I was a bit disappointed in my gaming performance. I won one scrappy game where I made some dumb mistakes, and we missed some important rules interaction; I only won that one from luck and some opponent mistakes. Then I played a genuinely good player and got stomped. Finally I had a rather easy match-up and stomped someone else. So not the most fulfilling from the viewpoint of someone who wants to practice the game and grow better. It was also eerily similar to the pattern from my last tournament. I think I’ll use Corregidor next time, partly to return to their all-round flexibility, partly because I’m painting new stuff for them, and partly because I want my Intruder and guided missiles if I have to fight that bloody Steel Phalanx next time!
Have any questions or feedback? Drop us a note in the comments below or email us at contact@goonhammer.com.
